Introduction to the Programming Utility (Windows)
This guide provides a quick overview of how to use the FOXPRO programming utility. Please watch the video below for a tutorial on using the utility:
Downloading & Installing the Utility
The installer for the FOXPRO Sound Programming Utility can be downloaded directly from our website at any time by
visiting this link.
When the page is loaded, locate the Download Information section. This box displays current version number, publication date, and the download button. To begin the download, click on the Download button.
Note: If you are upgrading from a previous version of the FOXPRO Programming Utility, there is no need to uninstall the original version before launching the new installer as it will automatically upgrade for you. Your original sound library storage folder will remain unchanged.
Depending upon what internet browser you are using, you may be prompted to "Run" or "Save" the file that is being downloaded. Some browsers may not prompt you for action and just save the file to your default Download folder. If you are presented the option, we recommend selecting either "Run"--in doing this, the installer will automatically launch when the file has been downloaded to your computer. Otherwise, you will need to browse to your Download folder for the install file which is titled: "foxpro-programming-utility-installer.exe". You will then need to open the file to launch the installer. The installation is very brief and straightforward. When the installation is complete, a message of success will display on the screen.
Launching the Utility
For Windows 7 and earlier, you can locate and launch the programming utility through your Start menu by going to Start ->
All Programs -> FOXPRO. Click on the FOXPRO Programmer icon to launch it. For Windows 8 and 8.1 users, you can push the
Windows button on your keyboard and then type in "FOXPRO Programmer" into the search field. You should then see the
icon for the utility and be able to click on it.
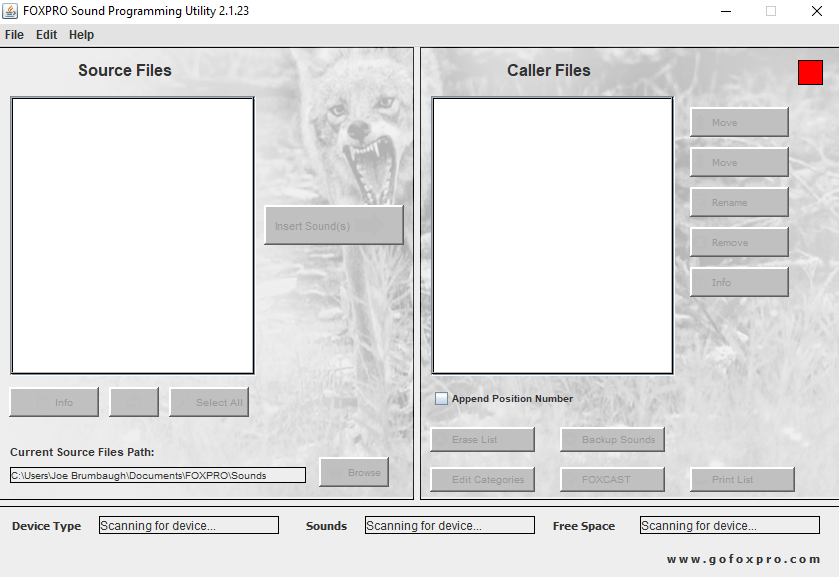
After the application has launched, the main interface will be displayed (see image below).
Connecting to your FOXPRO Game Call
Depending upon which FOXPRO game call you are working with, specific instructions for connecting the device to your computer may vary. For example, the Spitfire has a removable micro SD card which is connected to the computer through a card reader whereas other models may have an integrated USB port. Refer to your operator%u2019s manual and follow the supplied instructions for connecting your device to your computer.
After connecting your FOXPRO game call to your PC, the utility should recognize the device as being a valid product and display "Connected to..." followed by the device name. The "Caller Sound Files" column should become active and display the sounds currently installed. For example, in the image below, you will notice that we have a Shockwave connected to the computer and the contents of the Shockwave are being displayed in the "Caller Sound Files" column on the right.

File Locations / Sound Library
Your default sound library storage point is located under your Documents (or My Documents) folder\FOXPRO\Sounds. By clicking on the "Browse Library" button, you can browse the sounds stored at that location.
Installing New Sounds
Your sound library will probably be empty by default. You need to obtain sounds and place them into your library folder in order to install them into your FOXPRO game call. You can browse to different locations on your hard drive where sounds are stored by clicking on the "Browse Library" button to navigate there. When the appropriate files are found, double-click on any of the sounds to automatically load all files from that location into the utility.
Select one, multiple, or all sound files in the "Source Sound Files" column. Click on the position you wish to load the sounds into and click "Insert". Or if you are replacing existing sounds, use "Overwrite".
When complete, click on the "Update Caller" button to save your changes. Any sounds being removed will automatically be backed-up.
Exit the utility and update your remote control if needed.
Rearranging Sounds
Click on the sound you wish to move to another position in the "Caller Sound Files" column. Use the "Move Up" or "Move Down" arrow buttons to move the selected sound up or down the "Caller Sound Files" column. When you have the selected sound moved to your desired position, click on the "Update Caller" button to lock-in the change.
Backing Up Sounds to Your Computer
Click on the "Backup Call Files" button. By default, the sounds will be automatically saved in the "Backup" folder. If you wish to specify an alternate location, you can do so. Otherwise, click on the "Backup" button to perform the backup. A status bar will appear showing the progress of the backup process. When complete, the status bar will disappear. There are no other steps required.